Step by Step Guide to Creating a New Post on Blogger
This post is designed to walk a beginner blogger through how to access their blog, make their way to the post editor, create their post, and then publish it. If you are looking for more specific tutorials please post your request in the comments section of this post and I will inform you once I have posted the new “how to” tutorial.
Step 1 – Accessing Your Blogs
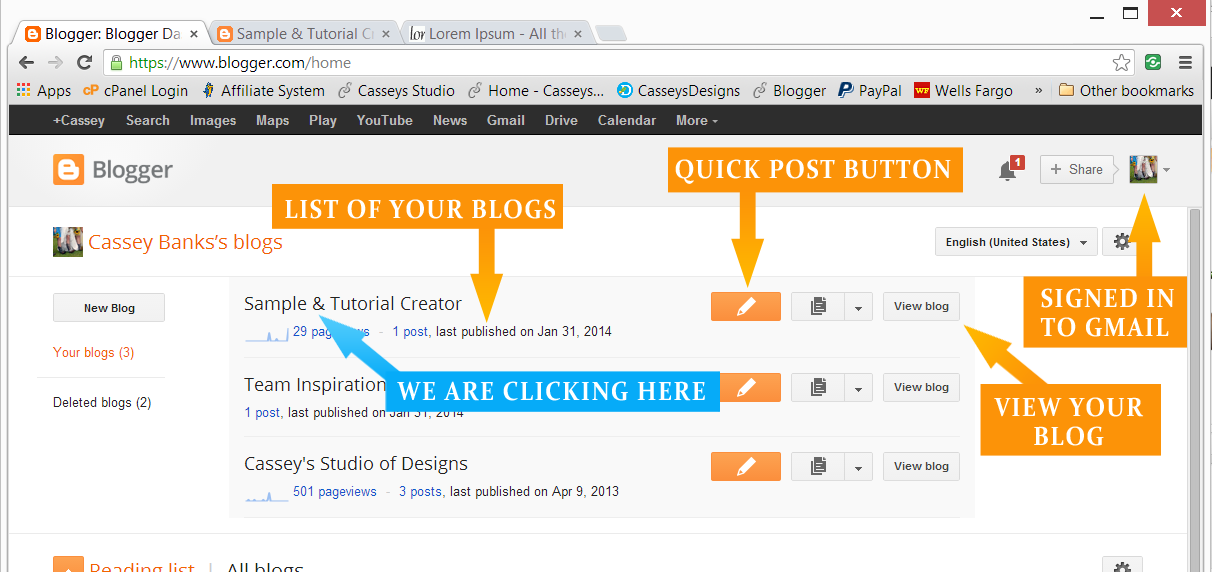
Sign into your gmail account that is linked to your blog. Then go to Blogger.com.
This above image features the page that we will land on. From this dashboard we can see which gmail account were signed into and a list of the blogs we manage from this account. The pencil button takes us to create a post for the corresponding blog, and we can click the view blog button to open our live blog in a new window.
For this tutorial we will be clicking the title name for the “Sample & Tutorial Creator” blog.
Step 2 – Navigating to Your Blog Dashboard
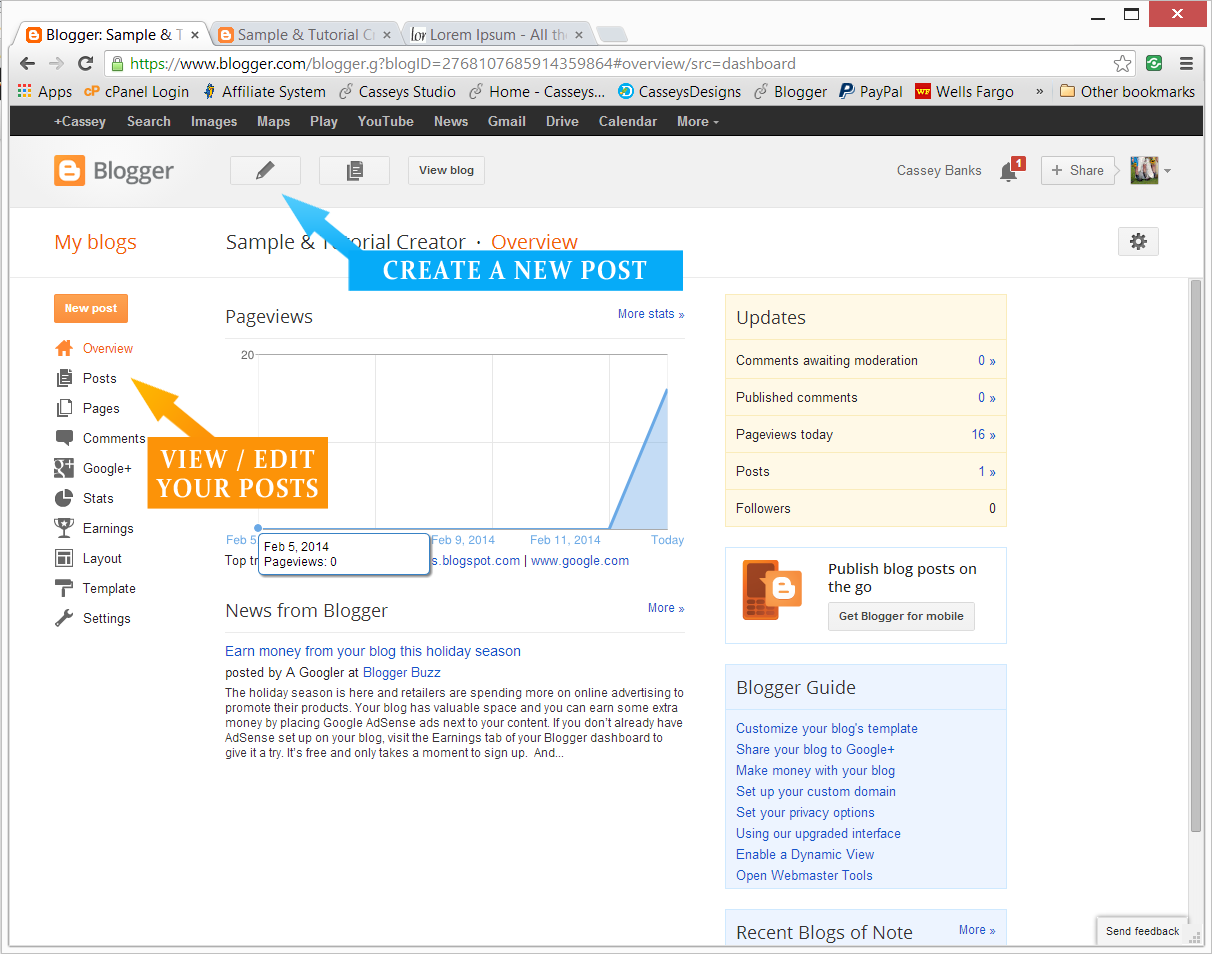
By clicking the title, we enter the dashboard for that specific blog. We can manage everything about our blog from here. We will be focusing on the posting aspects.
In the above image there are two sections that are important to managing our posts on this screen. The first is the “Posts” tab in the left side menu, by clicking here we’ll see a list of all of our posts. This is where we will click if we need to make changes to a post that we have already published or saved as a draft. The second is the pencil button at the top which will take us to create a new post. This is where we are going for the next step.
Step 3 – Naming Your Post and Adding Content
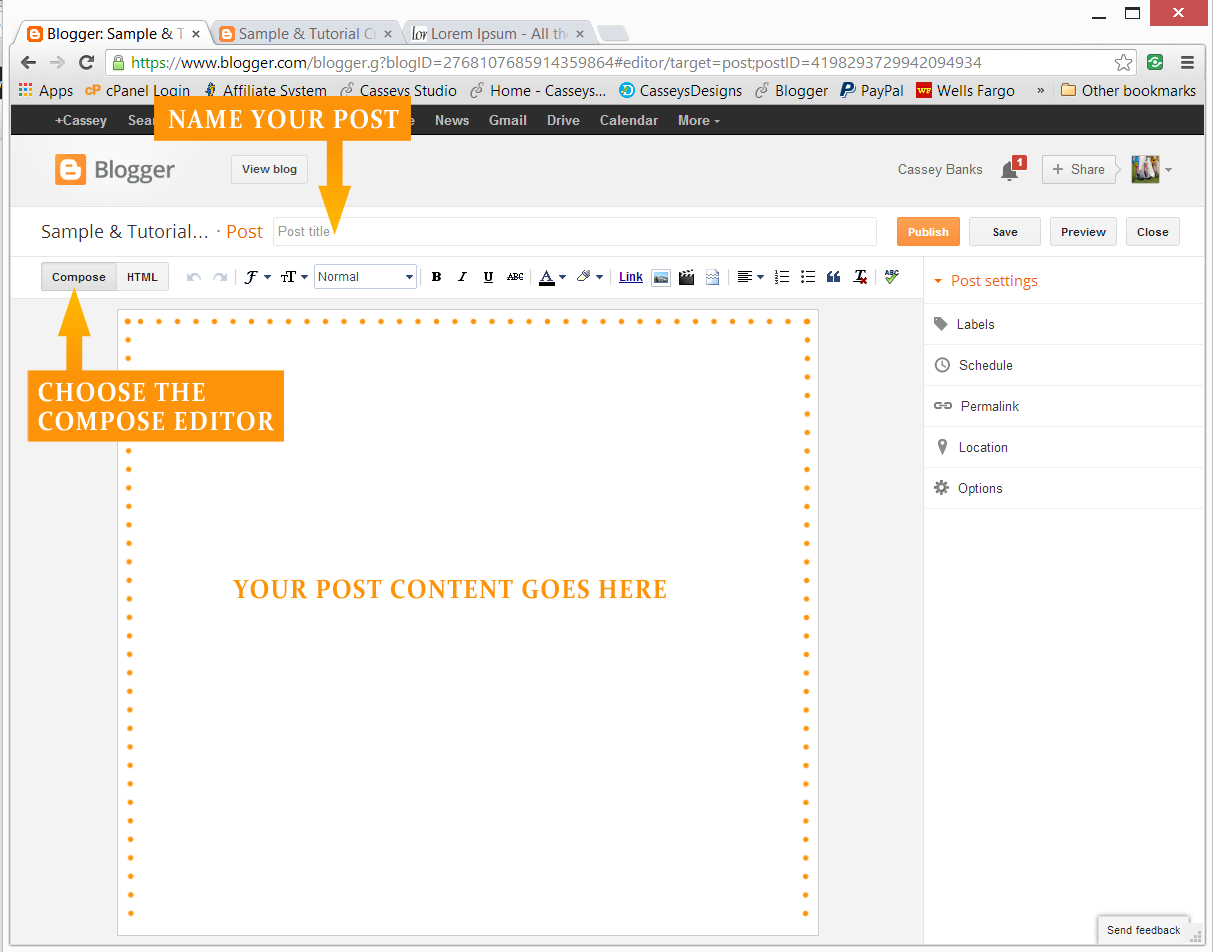
We are now in the post creator, here we want to ensure that we are in the compose editor. This editor allows us to visually see the basic formatting of our post.
Now, lets start by naming our post. We want to give our post an obvious name so that our readers will know what its about, but try to be unique at the same time. Next we will start adding our text to the content area, this area is outlined in the above image.
Step 4 – Make Your Headings Stand Out
Now that we have some content, we want to separate in into sections so that our readers will have a visual hierarchy to follow.
Here I have used the heading “New Post Heading” as my heading and “Sub-heading Title” as my sub-heading. We can also set minor and normal headings.
Step 5 – Using the Post Toolbar
There are lots of buttons on our toolbar, so we are going to briefly cover what the main ones do.
Following along with the toolbar in the image above we are going to go left to right. First we have the font tool, with this tool you can highlight the text you want to change and select from a pre-defined list of fonts. The next tool is for changing the size of your font, be sure to select the text you want to change the size of. We can also quickly make selected text bold, italic or underlined with the other buttons in this section.
In the next section we can change our font colors and background colors. Following that section are the buttons to add links, images and videos to our post. We will discuss formatting these in more detail in another tutorial. The last section is used for creating lists in your posts and defining our text alignment.
Step 6 – Adding Labels
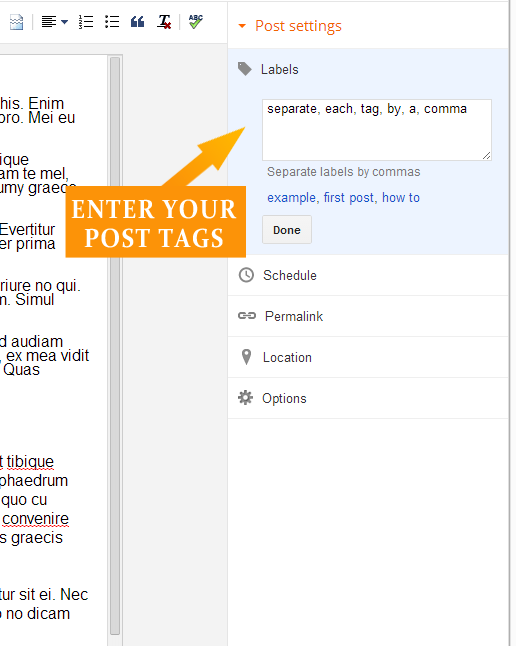
In the right sidebar menu of our post screen we have some settings we can work with.
The first section is for labels, labels are tags that apply to our blog. So if we are creating a post about a new recipe we concocted last night the following tags might apply :
- simple
- recipe
- chicken
- extra virgin olive oil
- alfredo
- 30 minutes
- no prep
- delicious
The list could be endless but we want to limit it to keywords that our readers are likely to search or that apply specifically to what our post is about.
Step 7 – Setting Post Publishing Times
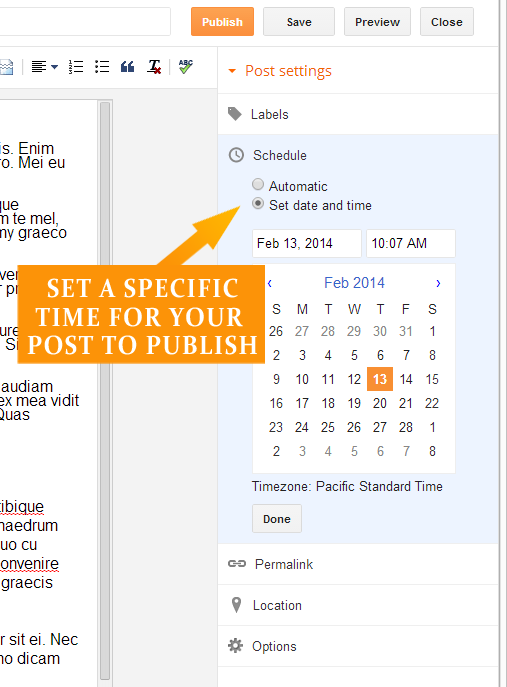
Normally, when we press publish our post is immediately live on the landing page of our blog. This next tab really comes in handy if we want to post at a specific time but we will likely forget and post it late, already be fast asleep, or be otherwise engaged at that time.
We can create a post and add all the fancy trimmings and publish right now, even if we don’t want it to post to our blog until tonight at mid-night. All we have to do to accomplish this is select a date from the calendar and enter the time we want it to post on that day.
We do need to ensure that we are setting the time for the correct time zone. For example, I am on Central Time and the timezone in my settings is on Pacific Standard. So, in a case like this we need to account for the time differences and set our time to post accordingly.
Step 8 – Publish Our Post
Its time to publish our post. Don’t worry if you have set a specific date and time for your post to go live, it will not post until that time but we still have to press publish for it to do so.
Step 9 – Share on Google+
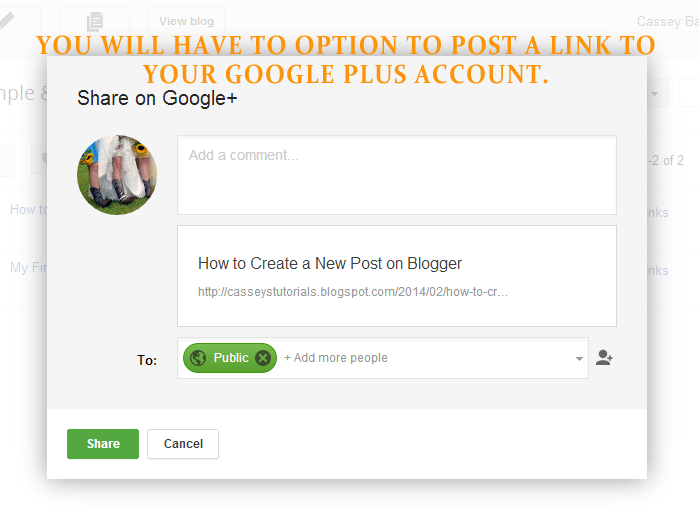
Google has it set up so that we can automatically share on our Google+ account after publishing our post. We can enter a brief description to get our connections interested and the link is already present in our post. We can also set the privacy level right from this screen.
If you don’t want to share your new post all you have to do is press cancel and nothing will be posted on your Google+ account.
Step 10 – Published Post Dashboard
After we publish our new post, we are taken to our post dashboard. Here we can use the Post Menu on the left to select if we want to view all of our posts or just the published ones. In the center of the page we can see each post listed. We can click on any post title here to re-enter the post editor and make changes or add more to the post.
At the top we also have access to create a new post and view our blog live in a new window. Side note * We want to set a routine for our readers, so defining how often we will be able to create new posts and when we will post them and then sticking to that timeline is a great idea.
Step 11 – View Your Post
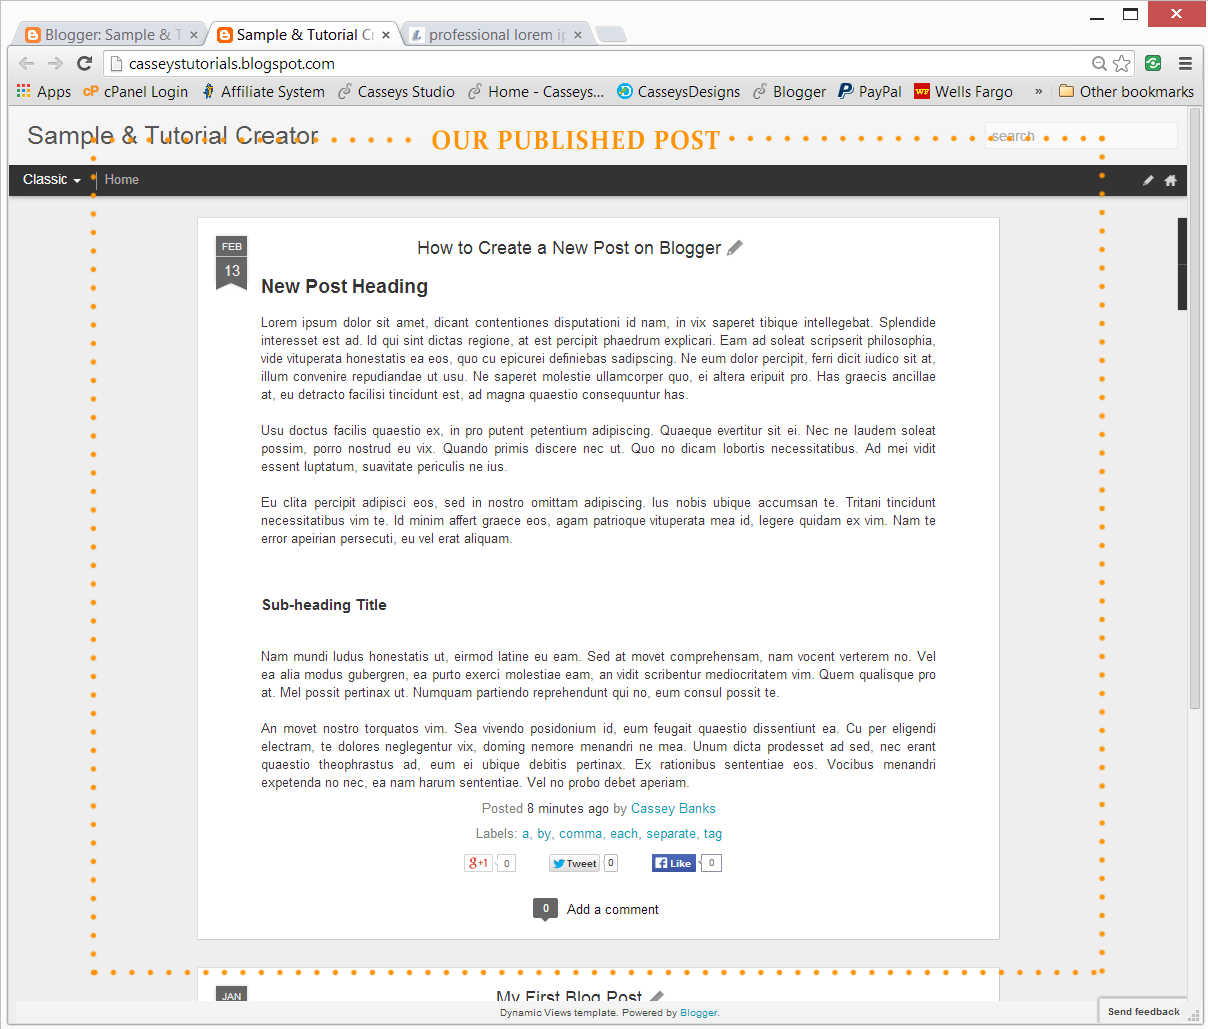
I do encourage you to view your post after you have published it to check for typos and to see how your post looks. If it looks off balance or difficult to read, re-entering the post editor is probably a step your should take asap if you want to keep your readers coming back.
Thanks for visiting Cassey’s Designs and I do hope that you found this tutorial informative and helpful! Please post a comment below if you have suggestions for improvement, request for new tutorials, or you just want to say Hi!
Oh and feel free to share this post with anyone you think might be interested!

