Step by Step Guide to Creating a New WordPress Blog Post
This post is designed to walk a beginner wordpress blog user through how to access their blog, make their way to the post editor, create their post, and then publish it. If you are looking for more specific tutorials please post your request in the comments section of this post and I will inform you once I have posted the new “how to” tutorial.
Step 1 – Accessing Your WordPress Dashboard
Go to your http://www.yoursite.com/wp-login. Use your sign in credentials to login to your user account.

Click to Enlarge
Step 2 – Navigating to Your Post Editor
Once you login in you will be redirected to your dashboard. Once there you will see your menu options on the left sidebar and the top fixed navigation bar. The top navigation bar will appear on the front end (where you view your website) and on the back end (your dashboard).
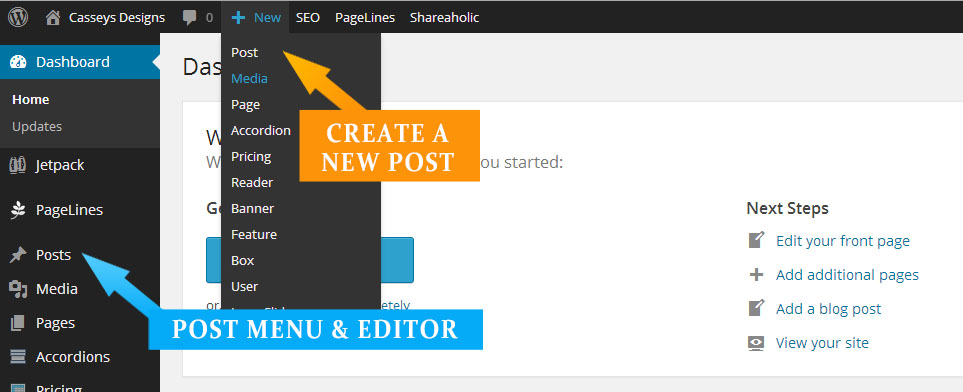
Click to Enlarge
In the above image there are two sections that are important to managing our posts on this screen. The first is the “Posts” tab in the left side menu, by clicking here we’ll see a list of all of our posts. This is where we will click if we need to make changes to a post that we have already published or saved as a draft. The second is the +New Menu at the top which will take us to create a new post, page or custom post type. We are going to select +New > Post to proceed to the next step.
Step 3 – Naming Your Post and Adding Content
We are now in the post editor. The first step anytime were creating a new post is to give it a name. Naming your post first fills in a url friendly slug. Next, we want to ensure that we are in the visual editor. This editor allows us to visually see the basic formatting of our post. If you are comfortable writing html then you can use the text editor.

Click to Enlarge
Now that we are in the visual editor we can start adding our content. The content area is outlined in the above image. WordPress now strips all of the formatting from copyed text when you paste it into the editor, so you can use ctrl + v to paste into the visual editor.
Step 4 – Make Your Headings Stand Out & Format Your Text
Now that we have some content, we want to separate in into sections so that our readers will have a visual hierarchy to follow and using formatting to highlight the important stuff.
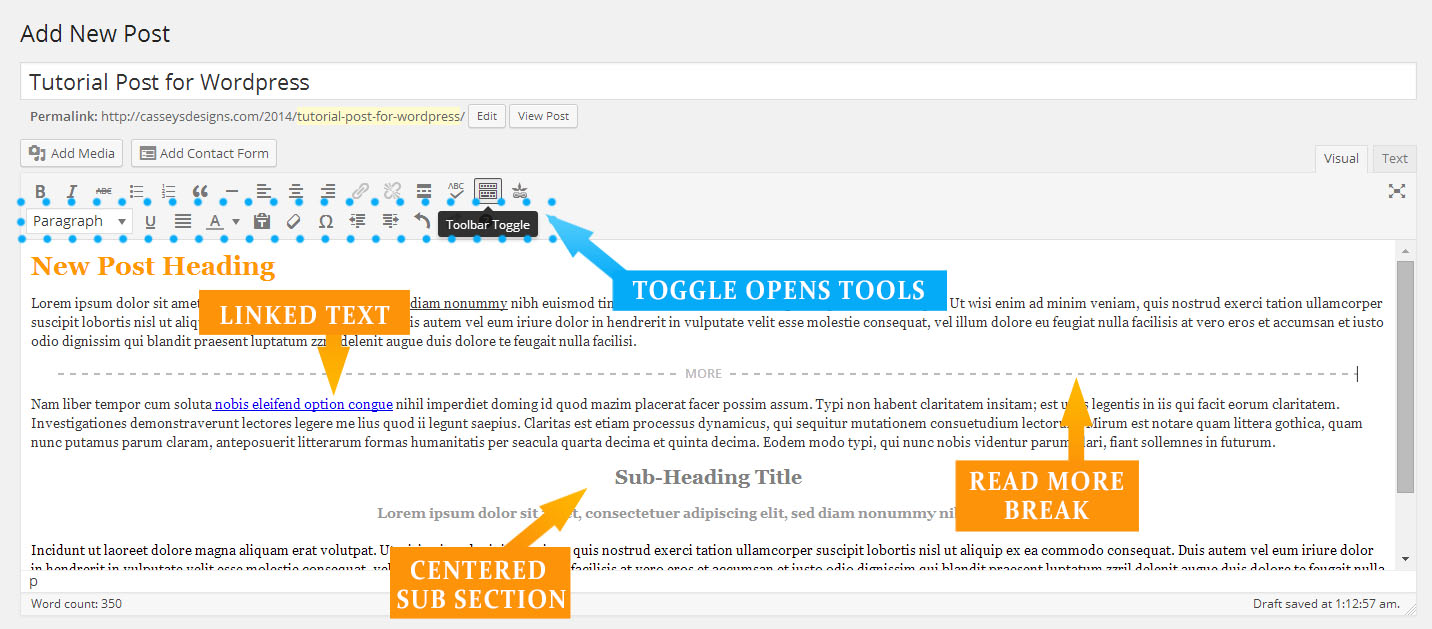
Click to Enlarge
Here I have used the heading “New Post Heading” as my Heading 1 and “Sub-heading Title” as my Heading 2 and centered it. The following line is also centered with a Heading 4. We can also set paragraph text, address text, and pre text.To access these options you will need to toggle the toolbar as outlined in the image above in blue.
Step 5 – Using the Post Toolbars
You have two toolbars in your editor.
The top bar has the following features, from left to right.
*Click on or Highlight the text you want to apply the formatting option to and then click the cooresponding button.
- Bold*
- Italics*
- Strike-through*
- Bulleted List* – You will need to use this option for each item in the list.
- Numbered List* – You will need to use this option for each item in the list.
- Blockquote*
- Horizontal Line – This will create a full width horizontal line wherever your cursor is, good for seperating sections of information.
- Align Left*
- Align Center*
- Align Right*
- Insert a link*
- Remove a link*
- Insert a Read More Link – This is only needed if you have opted not to use wordpress excerpts.
- Proofreading Option
- Toolbar Toggle – Opens your second toolbar with additional options.
- Insert Shortcode – This option will likely never be used unless your adding custom applications to the page.
The toogled bar has the following features, from left to right.
*Click on or Highlight the text you want to apply the formatting option to and then click the cooresponding button.
- Text Type Dropdown* – This contains your header and text options.
- Underline*
- Justify*
- Text Color* – This option will give you a color selector pop up to choose a color from.
- Paste as Plain Text
- Clear Formatting* – Removes all formatting settings like color, alignment and styles from selected text.
- Special Characters – Ensure your cursor is where you would like the chosen special charcter before using this option.
- Decrease Indent* – Decreases white space to the left of the text.
- Increase Indent* – Increase white space to the left of the text.
- Undo Last Action
- Redo Last Action
- Keyboard Shortcuts – This option will provide a pop up list of keyboard shortcuts that you can use.
Step 6 – Adding Media
I highly encourage you to use at least one image and to apply a featured image to every post.
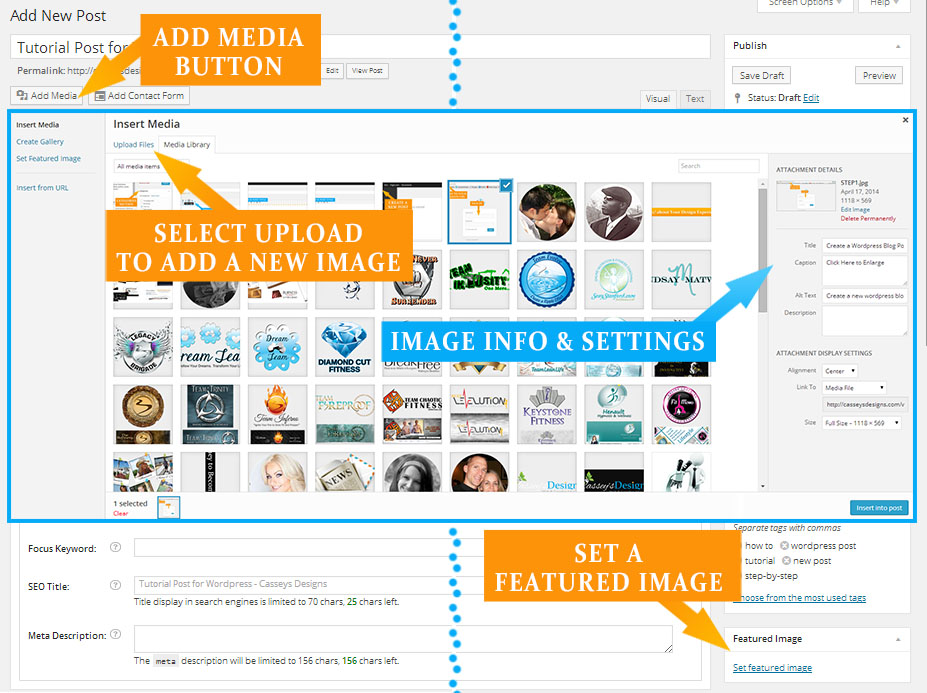
Click to Enlarge
To add a featured image you need to go to the right sidebar and select the link to add a featured image. This will open a pop up window to your media gallery. You can either select an image that you already have or you can click the upload tab to upload a new image. To add an image to your post you will click the “Add Media” button under the post title section and then utilize the pop up media gallery in the same manner.
When uploading a new image you should always fill in the image attachment information and you can also set up your preferences here.
These options are found in the right sidebar of the pop up media gallery.
- Title – Apply a descriptive title for the image.
- Caption – You can apply a caption here and the text will appear below your image contained in a border – display will vary depending on your theme.
- Alt Text – This is used for seo purposes, try to use your keywords in this description but keep it short.
- Description
- ———-
- Alignment – Your 4 options are Left, Center, Right or None, this will determine where the image goes if it is not full width.
- Linking – You can choose to have your image link to the full size image, the attachment page, a custom url or to not link to anything.
- Size – You have 3 or 4 options here depending on the image size. The smallest is thumbnail which shows a 150px by 150px image, the you have medium, large and full size which will vary in size.
Step 7 – Asigning Categories & Adding Tags
For this step we are going to be looking at the right sidebar.
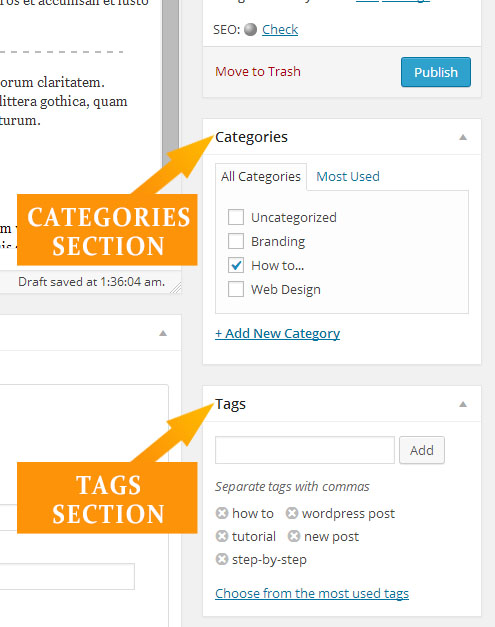
Click to Enlarge
The Categories section is where we decide to organize the post. For this post I am assigning it to the How to.. category so that anytime someone visits that category listing they will find this post as well as other how to.. posts.
The Tags sections is where we will add keywords that relate to our post. For this post I am using “how to.., wordpress post, tutorial, new post, step-by-step”. These are descriptive words for this post that people are likely to search if they are looking for information that is in this post. You can use any words/pharses you like, but be conservative when choosing how many tags to apply to your post. To apply multiple tags at once add a comma after each one.
Step 8 – Publish Our Post
Its time to publish our post.
This tutorial has covered all of the basics of creating a new post. There is a great deal more that can be done to optimize your posts, share them and make them visually appealing. Don’t forget to subscribe to get notifications when I post new tutorials!
Coming Soon – “Timed Publishing & Publicizing Your Posts”.
Would you like to see a specific topic addressed? Post it below or send me a message and I will get it up asap!
Have questions and/or advice relating to this tutorial? Join the conversation below!